Crochet Rose Flower Pattern Instructions

Here is one of my favorite crochet rose flower patterns. It is super quick and easy! You can make it in a variety of colors and add it to a hat you make or a hat that you buy. Or, you can even wear it in your hair as an accessory all by itself.
Once you complete your flower, you can either sew or glue felt on the bottom and sew or glue an alligator style hair clip to the felt to make it removable from the hat or wear in your hair. Or you can sew it to a hat so that it is permanent.
I will be posting a variation of this flower soon, please check back!
Here are a few of my youtube videos that may be helpful if you are a beginner to learn how to do the simple stiches required for this project.
Basic chain foundation stitch:
https://www.youtube.com/watch?v=DDBE1ORZ4Wg
Single crochet stitch for beginners:
https://www.youtube.com/watch?v=q71XypWx2Rs
Double crochet stitch for beginners:
https://www.youtube.com/watch?v=8xTUXMLBmPI
Pattern:
CH.......ChainSC........Single crochet
HDC....Half double crochet
DC.......Double crochet
Row 1: Leave an 18 inch tail or so and begin by creating a chain of 60, turn.
Row 2: Skip the first 2 CH and DC into the 3rd CH and each all the way to the end, turn.
Row 3: SC in the same space (first CH space where you turn, see photo), 5 DC in the 2nd CH space, * 1 SC in the next CH space, 5 DC in the next CH space *, repeat from * to * all the way to end of row. Leave an 18 inch inch tail to tie off later.
Here are photos to go along with the above instructions for beginners:
Row 1: Leave an 18 inch tail or so and begin by creating a chain of 60, turn.
Row 2: Skip the first 2 CH and DC into the 3rd CH and each all the way to the end, turn.


Row 3: SC in the same space (first CH space where you turn ~ where the silver crochet hook is pointing in photo below), 5 DC in the 2nd CH space (where the blue crochet hook is pointing in the photo below), * 1 SC in the next CH space, 5 DC in the next CH space *, repeat from * to * to end of row. Leave an 18 inch tail to tie off later.


This is what it will look like once you have completed the 3rd row:

Now you will begin to form your flower. Notice the front and the back of the row. The front of the row is the left photo, showing the edging. The photo on the right shows the back, you can see the edging does not show. Make sure the front is facing up when you start to wrap your flower.


With the top facing you, and the long 18 inch tail of yarn in your yarn needle (the tail closest to the end you begin wrapping, you can wrap from either end depending if you are right/left handed), begin wrapping your flower as shown in the photo a little at a time. Turn your flower to the side as shown below and every 1/2 inch or so, place a stitch through a couple layers of flower to secure it as you wrap it as shown.


This is what the bottom of your flower will look like as you keep wrapping and sewing. When you get to the last petal, tuck it a little toward center when you stitch it (shown in photo on the right), otherwise is sticks out kind of strange from the edge when you look at it from the top.


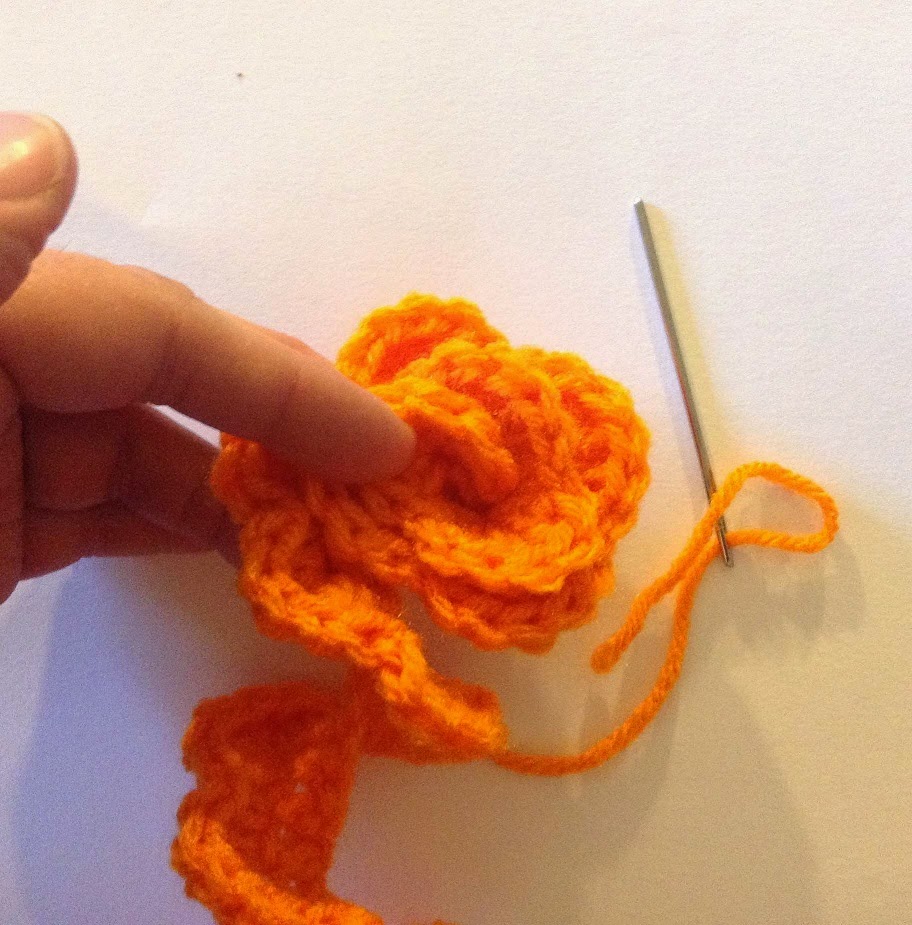
Now you can use the needle in the other long yarn tail to secure that edge down, too. Stitch the second yarn tail close to the first one so you can tie them off in a knot together securely as shown in the next few photos. (In the first photo, I'm pointing to the second yarn tail to begin using).


Your crochet rose flower is now complete and ready to attach to whatever you desire. Or, you can glue or sew a piece of felt to the bottom (in a matching color of course, similar to the top left photo in the cluster below) and then either glue or sew an alligator hair clip so it is removable from your hat, or you can wear it in your hair, or attach to another item.


No comments:
Post a Comment