Friday, February 28, 2014

Free Crochet Pattern Women's Cloche with Ruffle Brim

Free Crochet Pattern Women's Cloche with Ruffle Brim


Please do not copy, sell or offer these patterns as your own. Please share a link to my blog here for other's to find my free patterns, in doing so, I am able to offer more free patterns to everyone.

Crochet Women's Cloche with Ruffle Brim

Special notes about this pattern:
This hat will fit the average adult women’s head.
Recommended yarn:
I prefer to use Caron’s Simply Soft yarn or similar yarn due to the sheen and soft quality. This gives a very floppy soft feel and a beautiful quality appearance to the hat. (This yarn can be found in many chains such as Joann’s Craft store, Michael’s Craft store and Hobby Lobby craft store or similar.)
I recommend hand washing very gently and lying flat to dry. Do not use an electric dryer as your hat will just never look the same (my opinion).

Skill Level/Knowledge:

Single crochet
Half Double Crochet
Double crochet
Fastening off (securely)
Counting stitches
Magic circle (aka: Magic loop)  (Need help with the magic circle/magic loop? Check out my video tutorial here: http://youtu.be/WTh2Eoww5Y0)

You will need:

Scissors
H hook
K hook
Yarn needle

Abbreviations:

CH………Chain
SC………..Sing crochet
HDC…….Half double crochet
DC………Double crochet
SS……….Slip stitch
CT……….Count (stitch count)

Your Pattern:

Using a K hook, create a magic circle (Need help with the magic circle/magic loop? Check out my video tutorial here: http://youtu.be/WTh2Eoww5Y0) and CH 3 (counts as 1 here and throughout the pattern), and DC 9 more into the center of the circle. I recommend tightening and fastening off the tail at this point (pull the tail gently to tighten completely, and tie a couple knots. You can weave in the end once you complete your hat).
Row 2: CH 3, DC in same st, 2 DC in each around and (including super very last stitch that is actually the SS from the previous row, you will only do this on this row), SS into top of the CH from the beginning of the row (from here on out, you will always SS in the top of the CH 3) (CT: 20)
Row 3: CH 3, DC in same st, 2 DC in each around, this time(and the rest of the pattern), do not DC into the super very, very last st, SS (CT: 38)
Row 4: CH 3, DC in same st, *1 DC in next st, 2 DC in next st*, repeat from * to * around to end, ending in 2DC in the last st, SS (CT: 56)
Row 5-15: CH 3, DC in same st, 1 DC in each st, SS (CT: 56)
Row 16: CH 5, skip 1 st, SC into the next st, * CH 4, skip 1 st, SC into the next st* repeat from * to * around to end, you should have 27 chained loops around the brim once you complete. SS into the center of the 1st loop from the previous row
Row 17: working into the center of the first chained loop, 1 SC, 1 HDC, CH 1, 1 DC, 1 HDC, 1 SC (repeat in each loop around entire brim, do not CH 1 between loops) SS into the bottom of 1st SC to close, cut about 6 inch tail, securely fasten off and neatly.
If you have not already tightened and fastened off your beginning tail, do so now.
Congratulations! Your new hat is complete and ready to wear!

Here are a few photos of various fun ways to wear your new hat! Add some crochet flowers, or silk flowers, or ribbons for an added feminine touch!


Free instructions: How to crochet Red Heart Sashay ruffle scarf 2 different ways


Free instructions: How to crochet Red Heart Sashay ruffle scarf 2 different ways


If you would prefer a video tutorial for this crochet ruffle scarf, please click here: https://www.youtube.com/watch?v=eYB86eoZ97U


 Please do not copy, sell or offer these patterns as your own. Please share a link to my blog here for other's to find my free patterns, in doing so, I am able to offer more free patterns to everyone.


I recommend watching my youtube.com video before completing either pattern included here, for additional tips and tricks to help you while creating your scarf. You can view both knit and crochet versions here: http://www.youtube.com/user/YvetteMarieCrafts 


Notes:
A. Normally, using a different size hook or pair of knitting needles, will not make a difference in your work. The holes are already created for you to work with, so when you cast on, you are not concerned with being a tight or loose crochet/knitter. It does not really matter, I recommend the hook size below, because it is what I have found to work well in a comfortable manner, for each of the patterns in the way it is worked up. 
B. When working with this particular ruffle yarn/fabric (there are a more than a couple brands on the market), if you find a knot in your yarn/fabric as you are working it, you can do one of 2 things: (either one you choose, you will normally not see it once your scarf is complete!)   1. You can work right over the knot as if it were not there….or….  2. You can usually, untie the knot, and overlap the fabrics (one facing one direction and one facing the other), so that you have 2 layers crisscrossing, and work right through them following the pattern as if it were a normal layer.


Tips for working your patterns:
There are a couple things you will do with both versions.  
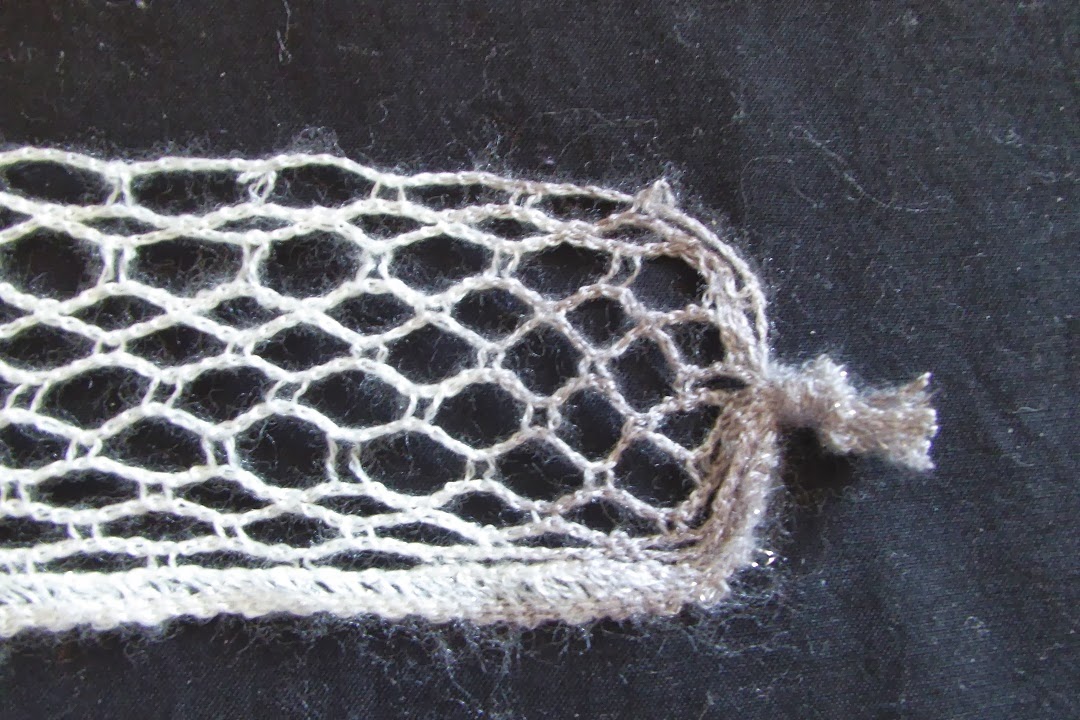
Step 1: (use for both versions), at the beginning of both versions, tie a knot in the end of your yarn/fabric leaving about ½ inch tail. Don’t trim too close, as it can unravel a little easier when washing, leaving a short tail is more secure. It will not show when your scarf is completed. (See next photo)


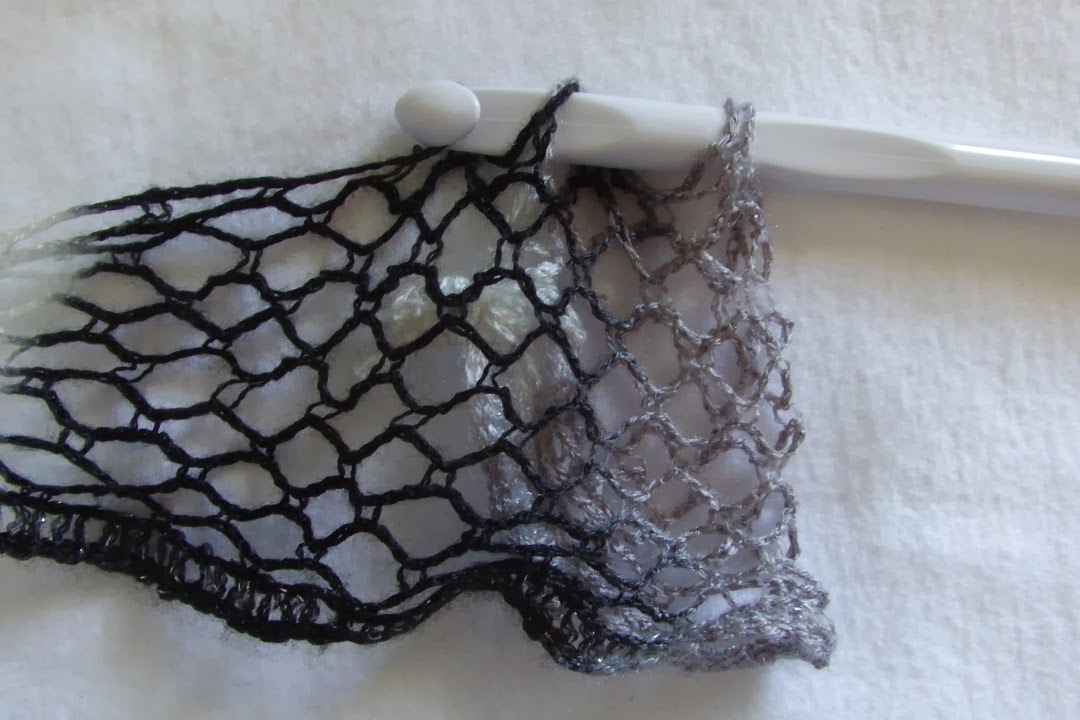
Both versions, you will be working into every other hole/loop. This gives you the ruffle effect that you won’t get if you crochet or knit into every single hole/loop. I use the very top row to work my stitches. Some people ignore the top row of stitches, and use the second row from the top to work into. Personally, I just use the first, top row to work my stitches. (Notice the difference in the top that you work with and the bottom or border of the yarn/fabric. (See next photo)


I highly recommend only hand washing or hand swishing in a basin/sink with some gentle soap, wring gently in a towel to remove excess moisture and line/air dry only. This will keep your scarf looking as new as possible longer, with normal wear and tear. 

No Crochet-Crochet version (this version works up very quickly and is great for beginners and children!)

Hook size K (recommended for this version)
Recommended # of stitches to cast on between 8-10. Not a lot of difference, 8 stitches will be a little bit skinnier version and 10 a little chunkier. 
In this version you can get 2 scarves at a decent length, using the whole skein for one scarf will result in a super long scarf, which you may prefer :0)
Also, this is a very forgiving pattern…if you miscount, and do 8 instead of 10 for one row (when you were working with 10 all along), you will never notice! Don’t worry about going back for a re-do on that row, just keep working.  Use step 1 above 
Step 2: fold over 4 holes/loops to back of fabric (this will be hidden in the end)


Step 3: “Cast on” stitches to be worked in the following manner: working from front to back, insert crochet hook in first stitch (will be doubled fabric from step 2 for only a couple stitches). * Skip a stitch, and pick up the following stitch from front to back (so you will bring your crochet hook up over the fabric in a sweeping motion to the front, and pick up the next stitch *. Repeat from * to * to cast on the number of stitches desired (8-10).


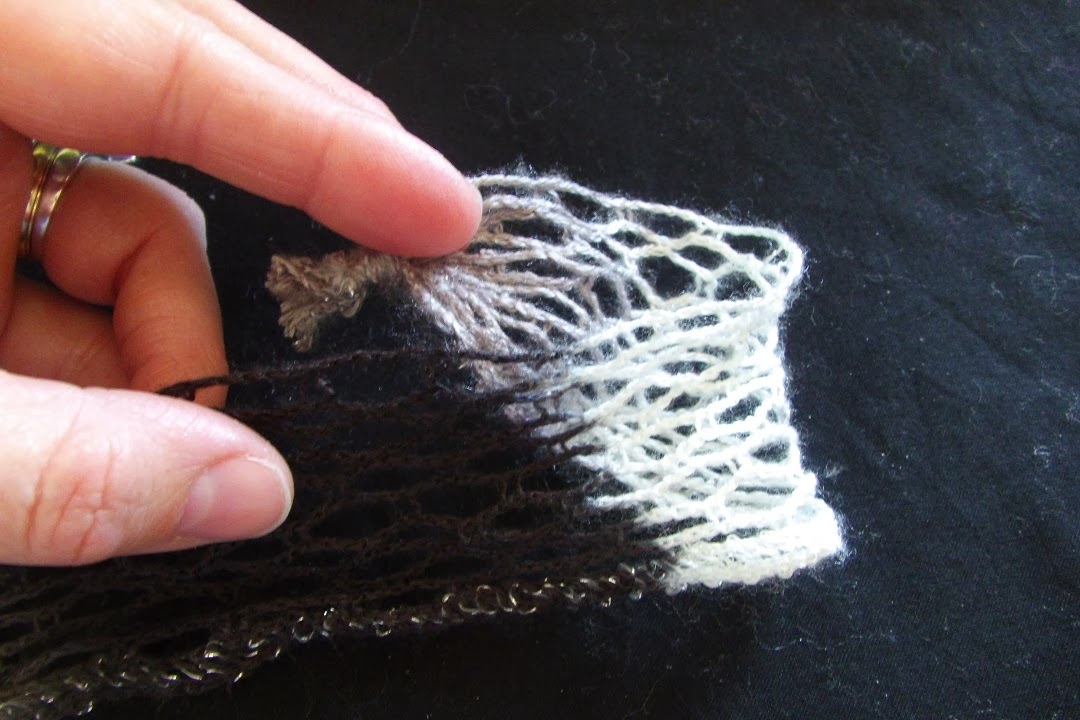
Step 4: Keeping only the first stitch closest to the hook end, pull that first stitch through the remaining stitches on the hook (including the doubled layer at the other end of the hook). You will now only have one stitch left on the hook. You have completed the first “row” of your scarf.  (Notice in the following photo, how the last 3 stitches farthest away from the hook are layered in 2, this is from the folded portion at the beginning of the pattern).


Step 5: Cast on another row in the following manner: skip the first hole/loop again, and pick up the next one as you did in step 3, from front to back. Skipping every other hole, cast on # of stitches you started with (ex: 8-10…if you started with 8 stitches, you will now cast on another 7 to make a full row of 8, etc.)


Step 6: Once you cast on your row, follow step 4 again. (The following photo is after 5 or 6 rows).


For the rest of the scarf, you will follow Row 4 and Row 5, consecutively until you reach the length desired. Again, if you use the whole skein, your scarf will probably reach the floor. If you choose to make a shorter version, you can make a nice scarf with about ½ of the skein at a time. Make one for you, and one for a friend! :0)

To end your scarf: after completing your last row and leaving about 4-6 inches of yarn, you will have 1 loop left on your hook. Take the remaining tail of the yarn and pull it through the loop on your hook. Tie a secure/tight knot as close to the loop (on top of the loop is better) you just pulled it through and snip off excess leaving about ½ inch for a secure finish. If you are hand-washing and line drying, which I highly recommend, this will be a very secure method of ending your scarf.
If you would like to see an easy quick video tutorial for this finishing method, click here: https://www.youtube.com/watch?v=mtfPl-YoeYw

“Real” Crochet ruffle scarf

(I do recommend some crochet experience with this version, however, watching my youtube.com video mentioned above, can be very helpful if you are a beginner for this scarf.)
You will use a full skein for one scarf.
For this version, you will actually create rows of “stitches” back and forth that you will work in a similar fashion to real crocheting with normal yarn where you crochet a row, turn your work, and then crochet the next row, etc. This version will be fuller than the first version above and more like the knitted version.  Hook size N, or you can use a smaller hook, like K. Make sure to not pull too tightly on your yarn as you work it, you want to have loose holes to find and work into easy.  Follow step 1 (for both versions)
Step 2: fold over 4 holes/loops to back of fabric (this will be hidden in the end) (see photo in first pattern version) 
Step 3: Casting on will be the same as the first version, “Cast on” stitches to be worked in the following manner: working from front to back, insert crochet hook in first stitch (will be doubled fabric from step 2 for only a couple stitches). * Skip a stitch, and pick up the following stitch from front to back (so you will bring your crochet hook up over the fabric in a sweeping motion to the front, and pick up the next stitch (making sure to skip one) *. Cast on 3 stitches in this manner. (Next photo shows the 3 stitches, one hidden in hook)


Step 4: Pull first 2 loops closest to end of hook through last loop farthest away from end of hook. You will now only have 1 loop left on hook.
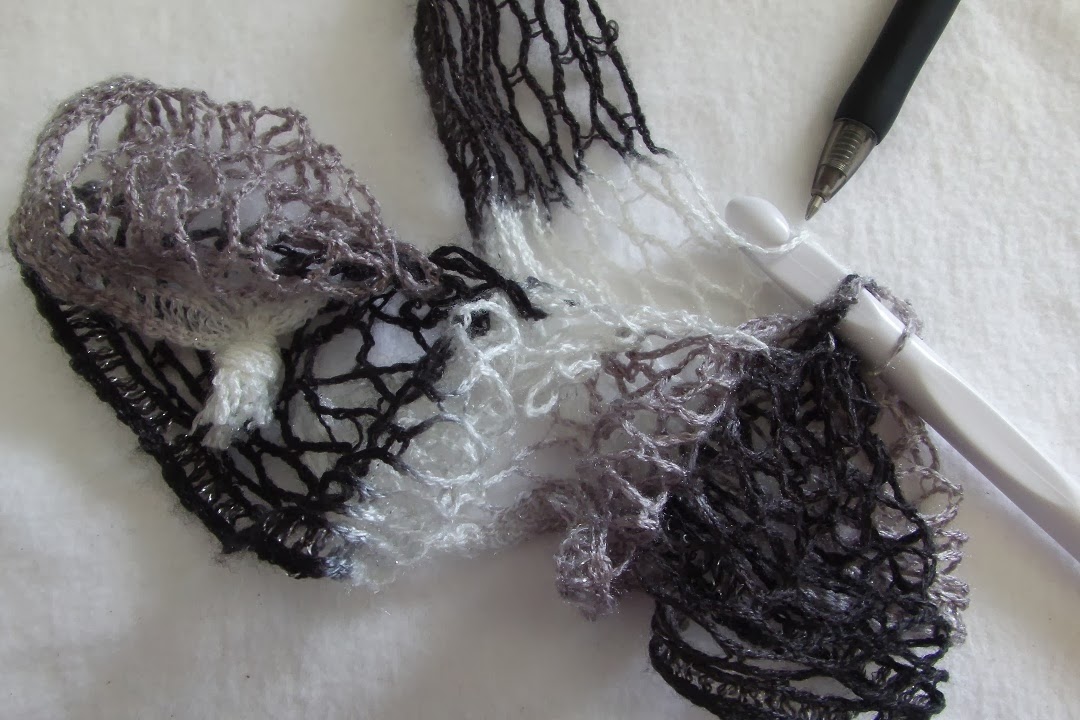
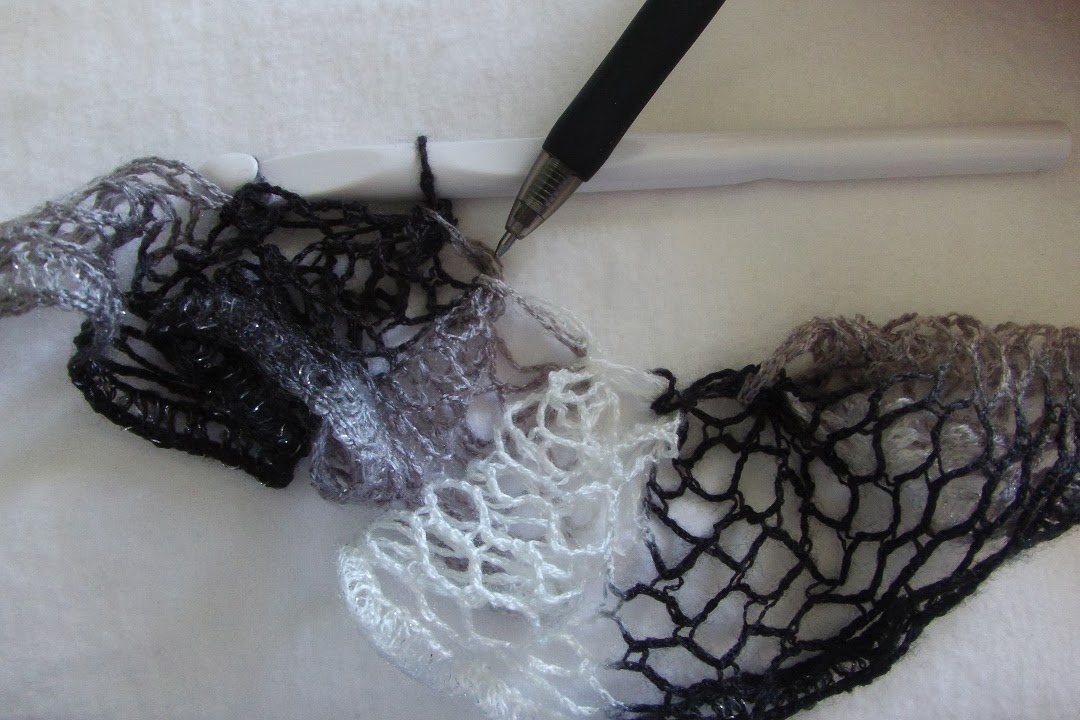
Step 5: Repeat this 4 more times… skipping a hole with the working yarn, add a loop to the existing loop on the hook, skip a loop and add a second loop to the hook, now you have 3 loops on the hook. Pull the first 2 loops closest to the end of the hook through last loop farthest away from the end of hook. The following photos show me pointing to the 5 stitches you have just created that you will be working in to as you create them each row you work back and forth. I have separated the yarn a bit so you can see the stitches clearly that were created. Get to know the look of these stitches,  you will use them every row.


Step 6: You will now create a chain one (Note: you will create a chain 1 at the end of every row before you turn your work). To create a chain 1, skip the next loop on the working yarn, and insert hook into the following loop, and pull that loop (closest to the hook) through the other loop on the hook. You have now created a chain 1
Step 7: Turn your work, meaning, turn your already worked row around, you are now going to work into those 5 stitches in the individual photos in step 5. The working yarn will be behind the row you are looking at, so you can easily access it to use.
Note: When completing the next row and each subsequent row, try not to pull the yarn too tight, as it makes it more difficult to find the stitches you are going to work into for each row as you turn your work.
Step 8: Insert hook into the first stitch, closest to the hook. Skip one loop from the working yarn, and put the next loop on the hook. You now have 3 loops on the hook (see photos…1st photo shows my chain 1 and then my work turned ready to work back down the row, 2nd photo I am pointing at the chain 1 from before you turned your work and now it is on the hook with the other 2 loops, 3rd photo I am pointing at the stitch from the worked row that you are working back down, and 4th photo I am pointing at the loop you just brought over your hook from the working yarn from the skein (it is white yarn in the photo, may be a little more difficult to see this one).


 Next, pull the loop closest to the hook only through the middle loop. Do not bring it through both loops yet. Now, you have 2 loops on your hook. Now, skip a loop from your working yarn on the skein, and place the next loop on your hook. Again, you have 3 loops on your hook. Now, bring the loop closest to the hook through both of the other 2 loops on the hook. You now have 1 loop on the hook. You have just basically, worked one single crochet (if you can call it that, with this yarn).  You are now going to repeat all of step 8 for each of the 4 remaining stitches across the row. Make sure you skip a stitch when you insert your hook into the next loop and draw up that first loop from the working yarn and again pulling up the 2nd loop from the working yarn. This will keep things comfortable, and not too tight, and it will create your ruffle nicely.
Step 9: Repeat this process for the entire skein of yarn/fabric. When you get near the end of the skein, make sure you have at least 4-6 inches for your finishing. You do not have to work a full row before finishing, if you happen to work ½ a row, and you have the 4-6 inches needed to finish, you can complete the “end your scarf” directions from this point. 
To end your scarf: after completing your last row and leaving about 4-6 inches of yarn, you will have 1 loop left on your hook. Take the remaining tail of the yarn and pull it through the loop on your hook. Tie a secure/tight knot as close to the loop you just pulled it through and snip off excess leaving about ½ inch
for a secure finish. If you are hand-washing and line drying, which I highly recommend, this will be a very secure method of ending your scarf.
If you would like to see an easy short video tutorial on how to end finish your ruffle scarf, please click here: https://www.youtube.com/watch?v=mtfPl-YoeYw

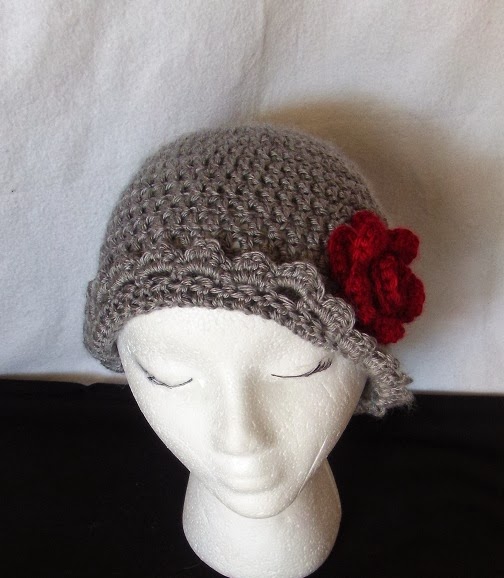
Congratulations! You have now finished one of the crochet versions of the ruffle scarf!


Free newborn crochet Santa Long Tail hat pattern with Supersize Pompom

Free newborn crochet Santa Long Tail hat pattern with Supersize Pompom


 Please do not copy, sell or offer these patterns as your own. Please share a link to my blog here for other's to find my free patterns, in doing so, I am able to offer more free patterns to everyone.


I recommend using Caron's Simply Soft yarn (sold at Joann Fabric & Craft stores or Micheal's Crafts) or yarn Bee Soft Secret yarn (sold at Hobby Lobby) because of the soft feel and beautiful sheen they have.They have a nice drape to them when your hat is complete and feel soft instead of scratchy like most standard inexpensive yarns. If you use another cheaper yarn unlike the ones I mentioned above, the hat may not come out the correct size or look & wear as nice. I also recommend gentle hand washing and air dry (no electric dryer).

Newborn Crochet Santa Long Tail hat pattern with Supersize pompom

You will need:
Size J crochet hook
Yarn needle
Scissors
Stiff board or cardboard or something similar about 5 inches by 9 inches to make your pompom

Abbreviations:
DC.....double crochet
SC.....single crochet
SS.....slip stitch
CT.....count (stitch count)

Begin with magic circle (aka: magic loop) and CH3 (counts as first DC), DC 5 into center of magic circle for a total of 6 DC.  Need help with the magic circle/magic loop? Check out my video tutorial here: http://youtu.be/WTh2Eoww5Y0
SS into top of first CH of first DC to close circle. I recommend tightening and securing magic loop with method in video at this point to avoid it loosening and opening while completing your hat.

Row 2-4: CH3 and DC in same, DC1 in each around to end, SS (from this point forward, I will just state SS) (CT: 6)
Row 5: CH3 and DC in same, DC1 in each of next 2 CH, DC2 in next CH, DC1 in each of last 2 CH, SS (CT: 7)
Row 6: CH3 and DC in same, DC1 in each around to end, SS (CT: 7)
Row 7: CH3 and DC in same, DC in in next CH, * DC2 in next CH, DC1 in each of next 2 CH * repeat from * to * around to end, SS (CT: 9)
Row 8-10: CH3 and DC in same, DC1 in each around to end, SS (CT: 9)
Row 11: CH3 and DC in same, DC1 in next CH, * DC2 in next CH, DC1 in each of next 2 CH * repeat from * to * around to end, SS (CT: 12)
Row 12-13: CH3 and DC in same, DC1 in each CH around to end, SS (CT: 12)
Row 14: CH3 and DC in same, * DC1 in each of next 2 CH, DC2 in next CH * repeat from * to * around to end, SS (CT: 15)
Row 15-16: CH3 and DC in same, DC1 in each CH around to end, SS (CT: 15)
Row 17: CH3 and DC in same, * DC1 in each of next 2 CH, DC2 in next CH * repeat from * to * around to end, SS (CT: 19)
Row 18: CH3 and DC in same, DC in each CH around to end, SS (CT: 19)
Row 19: CH3 and DC in same, * DC1 in each of next 2 CH, DC2 next CH * repeat from * to * around to end, SS (CT: 24)
Row 20-22: CH3 and DC in same, DC in each CH around to end, SS (CT: 24)
Row 23: CH3 and DC in same, * DC1 in each of nexgt 2 CH, DC2 in next CH * repeat from * to * around to end, SS (CT: 31)
Row 24-27: CH3 and DC in same, DC in each CH around to end, SS (CT: 31)
Row 28: CH3 and DC in same, * DC1 in each of next CH, DC2 in next CH * repeat from * to * around to end, SS (CT: 38)
Row 29-32: CH3 and DC in same, DC in each CH around to end, SS (CT: 38)
Row 33: CH3 and DC in same, DC1 in each of next 3 CH, DC2 in next ST * repeat from * to * around to end, SS (CT: 48)
Row 34-38: CH3 and DC in same, DC in each CH around to end, SS (CT: 48)

Change to white yarn (or other chosen color for border):
Row 39-42: CH3 and DC in same, DC in each CH around to end, SS (CT: 48)

At end of Row 42, securely fasten off your yarn and weave in tail.

Create and attach pompom:

Using your 5 X 9 inch piece of cardboard, use your border color and wrap around the board (on the smaller 5 in. side) 150 times. Yes, 150 times :0) I know this seems like a lot, but, believe me, it really isn’t. And, it will give you a nice fluffy tail, (see the following photo.) Also, cut a piece of yarn about 40 inches long to use for wrapping around your pompom and securing it to your hat.


Next, you will very carefully slide the wrapped yarn off of the board, keeping it’s shape. Fold the long 40 in. piece of yarn in half and place under the “ball” of yarn, making sure to center it as shown below. 


Pull the open end of the long yarn through the folded end as show and pull to tighten it around the ball, making sure to keep it centered so the pompom will come out even (below) Pull very tightly, however, be careful not to pull so tight that you break the yarn (I have had this happen to me :0) Pull tight so that once the pompom is complete, you lose very few strands from your pompom or none.
Take one tail in right hand and one in left and pull apart tightly and wrap around ball to the back. Pull tightly taking care not to break the yarn and tie in a couple 
knots. Repeat around the back again for added security.


Once, tied and tight, hold the long string in your hand, and you will cut the loops in small sections until they are all cut (below)


Your pompom will be quite shaggy, so you will now groom it. Hold it as shown below, and trim around little by little in a rounded fashion, and shaking out often to see how it is looking, continue to trim as shown until you get a nice round fluffy pompom as shown below.


Let’s now attach it to your hat. Using the long string you tied it together with, attach it to the end of your hat. I normally attach it as close to the end as possible while making sure it is secure. I pull one end through one side of the hat and the other string through the other, and go back through again in the next hole and tie off very tight, that way it sort of pulls right back into the hat when you cut off the excess tail from the 40 inches you started with. (see next photo)


Congratulations! Your long tail pompom elf hat is now complete and ready to wear!

Free 3-6 Month crochet Long Tail Santa hat pattern with Supersize Pompom


Free 3-6 Month crochet Long Tail Santa hat pattern with Supersize Pompom


 Please do not copy, sell or offer these patterns as your own. Please share a link to my blog here for other's to find my free patterns, in doing so, I am able to offer more free patterns to everyone.


I recommend using Caron's Simply Soft yarn (sold at Joann Fabric & Craft stores or Micheal's Crafts) or yarn Bee Soft Secret yarn (sold at Hobby Lobby) because of the soft feel and beautiful sheen they have. They have a nice drape to them when your hat is complete and feel soft instead of scratchy like most standard inexpensive yarns. If you use another cheaper yarn unlike the ones I mentioned above, the hat may not come out the correct size or look & wear as nice. I also recommend gentle hand washing and air dry (no electric dryer).

3-6 months Crochet Santa Long Tail hat pattern with Supersize pompom

Begin with magic circle (Need help with the magic circle/magic loop? Check out my video tutorial here: http://youtu.be/WTh2Eoww5Y0) and then CH 3, (your CH 3 counts as 1 DC here and thru entire pattern), DC 7 more into the center of the magic circle, SS. You should now have a total of 8 stitches. (This row will count as Row 1) I recommend tightening and securing magic loop with method in video at this point to avoid it loosening and opening while completing your hat,  otherwise, doing so later is a task since the area will be very narrow once you have a few rows crocheted.) 
Row 2 thru 4: CH 3, DC in same, 1 DC in each around to end, SS (CT: 8 
Row 5: CH 3, DC in same, 1 DC in next stitch, * 2 DC in next, 1 DC in next 2 st * (repeat from * to * around to end, SS (CT: 10) 
Row 6: CH 3, DC in same, 1 DC in each around to end, SS (CT: 10) 
Row 7: CH 3, DC in same, * 1 DC in next 2 st, 2 DC in next st * (repeat from * to * around to end), SS (CT: 12)  
Row 8 – 10: Row 6: CH 3, DC in same, 1 DC in each around to end, SS (CT: 12) 
Row 11: CH 3, DC in same, * 1 DC in each of next 2 st, 2 DC in next st * (repeat from * to * around to end), SS (CT: 15) 
Row 12 – 14: CH 3, DC in same, 1 DC in each around to end, SS (CT: 15) 
Row 15: CH 3, DC in same, * 2 DC in next st, 1 DC in each of next 2 st, * (repeat from * to * around to end), SS (CT: 20) 
Row 16 & 17: CH 3, DC in same, 1 DC in each around to end, SS (CT: 20) 
Row 18: CH 3, DC in same, * 1 DC in each of next 2 st, 2 DC in next st * (repeat from * to * around to end), SS (CT: 26) 
Row 19: CH 3, DC in same, 1 DC in each around to end, SS (CT: 26) 
Row 20: CH 3, DC in same, * 1 DC in each of next 2 st, 2 DC in next st * (repeat from * to * around to end), SS (CT: 34) 
Row 21-24: CH 3, DC in same, 1 DC in each around to end, SS (CT: 34) 
Row 25: CH 3, DC in same, * 1 DC in each of next 2 st, 2 DC in next st * (repeat from * to * around to end), SS (CT: 44) 
Row 26-29: CH 3, DC in same, 1 DC in each around to end, SS (CT: 44) 
Row 30: CH 3, DC in same, * 1 DC in each of next 3 st, 2 DC in next st * (repeat from * to * around to end), SS (CT: 54) 
Row 31-35: CH 3, DC in same, 1 DC in each around to end, SS (CT: 54)

Change to white yarn (or other chosen color for border): 

Row 36-39: CH 3, DC in same, 1 DC in each around to end, SS (CT: 54) 
At the end of row 39, securely fasten off your yarn and weave in tail.


Create and attach pompom:

Using your 5 X 9 inch piece of cardboard, use your border color and wrap around the board (on the smaller 5 in. side) 150 times. Yes, 150 times :0) I know this seems like a lot, but, believe me, it really isn’t. And, it will give you a nice fluffy tail, (see the following photo.) Also, cut a piece of yarn about 40 inches long to use for wrapping around your pompom and securing it to your hat.


Next, you will very carefully slide the wrapped yarn off of the board, keeping it’s shape. Fold the long 40 inch piece of yarn in half and place under the “ball” of yarn, making sure to center it as shown below.


Pull the open end of the long yarn through the folded end as show and pull to tighten it around the ball, making sure to keep it centered so the pompom will come out even (below) Pull very tightly, however, be careful not to pull so tight that you break the yarn (I have had this happen to me :0) Pull tight so that once the pompom is complete, you lose very few strands from your pompom or none.
Take one tail in right hand and one in left and pull apart tightly and wrap around ball to the back. Pull tightly taking care not to break the yarn and tie in a couple 
knots. Repeat around the back again for added security.


Once, tied and tight, hold the long string in your hand, and you will cut the loops in small sections until they are all cut (below)


Your pompom will be quite shaggy, so you will now groom it. Hold it as shown below, and trim around little by little in a rounded fashion, and shaking out often to see how it is looking, continue to trim as shown until you get a nice round fluffy pompom as shown below. 


Let’s now attach it to your hat. Using the long string you tied it together with, attach it to the end of your hat. I normally attach it as close to the end as possible while making sure it is secure. I pull one end through one side of the hat and the other string through the other, and go back through again in the next hole and tie off very tight, that way it sort of pulls right back into the hat when you cut off the excess tail from the 40 inches you started with. (see next photo)


Congratulations! Your long tail pompom elf hat is now complete and ready to wear!

Free Women's Crochet Hat Pattern - Red Riding Hood


Free Women's Crochet Hat Pattern - Red Riding Hood


This Women's Size Red Riding Hood hat is crocheted with 2 strands of yarn together for an extra warm cozy fun hat!

Red Riding Hood crochet hat pattern

You will need:
Size N hook
Yarn needle
Scissors

Abbreviations:
CH.....chain
DC.....double crochet
SC.....single crochet
SS.....slip stitch
CT.....count (stitch count)

Keep a tail of about 18 inches long when beginning, which will be used to sew up back of hat.
Using 2 strands of yarn...CH 53

Row 1: skip 3 CH's, DC1 in each CH across to end, CH3, turn
Row 2-17: DC in same and DC1 in each CH across to end, CH3, turn
Note: at the end of Row 17 CH2 (instead of CH3) and turn
Row 18: SC in same and SC1 in each CH across to end, CH2, turn
Row 19 & 20: repeat Row 18.
Fasten off and securely weave in tail.

To give a finished look to the edges before we close up the back of the hat, SC along the left and right side of hat (photo), tie off and securely weave in tail. I recommend beginning your SC at the front of the hat by where you left off with Row 20 and working toward the back of the hat that is all DC (the front is the SC)

To close the hat (before adding braids)

Fold your hat in half (SC row) using the 18 inch starter tail and yarn needle, weave the yarn in and out around the edge (you are not sewing it, you will cinch it by pulling the tail once you reach the end).


Once you reach the end, pull the tail firmly cinching it closed until you have a closed hole and tie a secure knot. Since you are working with a double layer of yarn, make sure you are picking up both strands when weaving around the edge.


After you pull the yarn closing the back of the hat, without cutting the tail, sew down the back of the hat about 5 inches (not all the way to the end of the row). Cut to about 5 inches, tie off and weave in tails. Leave the rest of the edge open.


Turn your hat out side. Now you can make & attach the braids.

Making & Attaching braids:

Make 6 piles of yarn each consisting of 4 strands of yarn measuring 26 inches long. (You should have 24 strands of yarn total)
Photo shows 3 piles of 4 strands for one side of hat

You will use 3 piles to make one braid on one side and 3 piles for the other side. 
You will now take one pile of yarn (4 strands) and pull it through the corner stitch as shown below, pulling it through to match evenly.
Each pile will be inserted in the corner like the photo above

Take 2nd pile and pull it through the edge as shown above, in the next stitch so it stays close to the 1st pile for braiding, again lining up strands to meet evenly.Take one pile of yarn and pull through the corner of the hat as show, lining up the strands to meet evenly once they are pulled through.
Take 3rd pile and pull through next stitch (as shown above)
Complete this for both sides of hat.

Now you are read to braid your sides
Braid them a little loose, otherwise they feel too stiff and won't hang gently if you tie them.


Leave a few inches at bottom of braid and tie a knot to secure the braid. Cut the fringe at the bottom of the braid if it needs to be evened out.


Congratulations! You have completed your Crochet Little Red Riding Hood hat!