Free 3-6 Month crochet Long Tail Santa hat pattern with Supersize Pompom

Please do not copy, sell or offer these patterns as your own. Please share a link to my blog here for other's to find my free patterns, in doing so, I am able to offer more free patterns to everyone.
I recommend using Caron's Simply Soft yarn (sold at Joann Fabric & Craft stores or Micheal's Crafts) or yarn Bee Soft Secret yarn (sold at Hobby Lobby) because of the soft feel and beautiful sheen they have. They have a nice drape to them when your hat is complete and feel soft instead of scratchy like most standard inexpensive yarns. If you use another cheaper yarn unlike the ones I mentioned above, the hat may not come out the correct size or look & wear as nice. I also recommend gentle hand washing and air dry (no electric dryer).
3-6 months Crochet Santa Long Tail hat pattern with Supersize pompom
Begin with magic circle (Need help with the magic circle/magic loop? Check out my video tutorial here: http://youtu.be/WTh2Eoww5Y0) and then CH 3, (your CH 3 counts as 1 DC here and thru entire pattern), DC 7 more into the center of the magic circle, SS. You should now have a total of 8 stitches. (This row will count as Row 1) I recommend tightening and securing magic loop with method in video at this point to avoid it loosening and opening while completing your hat, otherwise, doing so later is a task since the area will be very narrow once you have a few rows crocheted.)
Row 2 thru 4: CH 3, DC in same, 1 DC in each around to end, SS (CT: 8
Row 5: CH 3, DC in same, 1 DC in next stitch, * 2 DC in next, 1 DC in next 2 st * (repeat from * to * around to end, SS (CT: 10)
Row 6: CH 3, DC in same, 1 DC in each around to end, SS (CT: 10)
Row 7: CH 3, DC in same, * 1 DC in next 2 st, 2 DC in next st * (repeat from * to * around to end), SS (CT: 12)
Row 8 – 10: Row 6: CH 3, DC in same, 1 DC in each around to end, SS (CT: 12)
Row 11: CH 3, DC in same, * 1 DC in each of next 2 st, 2 DC in next st * (repeat from * to * around to end), SS (CT: 15)
Row 12 – 14: CH 3, DC in same, 1 DC in each around to end, SS (CT: 15)
Row 15: CH 3, DC in same, * 2 DC in next st, 1 DC in each of next 2 st, * (repeat from * to * around to end), SS (CT: 20)
Row 16 & 17: CH 3, DC in same, 1 DC in each around to end, SS (CT: 20)
Row 18: CH 3, DC in same, * 1 DC in each of next 2 st, 2 DC in next st * (repeat from * to * around to end), SS (CT: 26)
Row 19: CH 3, DC in same, 1 DC in each around to end, SS (CT: 26)
Row 20: CH 3, DC in same, * 1 DC in each of next 2 st, 2 DC in next st * (repeat from * to * around to end), SS (CT: 34)
Row 21-24: CH 3, DC in same, 1 DC in each around to end, SS (CT: 34)
Row 25: CH 3, DC in same, * 1 DC in each of next 2 st, 2 DC in next st * (repeat from * to * around to end), SS (CT: 44)
Row 26-29: CH 3, DC in same, 1 DC in each around to end, SS (CT: 44)
Row 30: CH 3, DC in same, * 1 DC in each of next 3 st, 2 DC in next st * (repeat from * to * around to end), SS (CT: 54)
Row 31-35: CH 3, DC in same, 1 DC in each around to end, SS (CT: 54)
Change to white yarn (or other chosen color for border):
Row 36-39: CH 3, DC in same, 1 DC in each around to end, SS (CT: 54)
At the end of row 39, securely fasten off your yarn and weave in tail.
Create and attach pompom:
Using your 5 X 9 inch piece of cardboard, use your border color and wrap around the board (on the smaller 5 in. side) 150 times. Yes, 150 times :0) I know this seems like a lot, but, believe me, it really isn’t. And, it will give you a nice fluffy tail, (see the following photo.) Also, cut a piece of yarn about 40 inches long to use for wrapping around your pompom and securing it to your hat.


Next, you will very carefully slide the wrapped yarn off of the board, keeping it’s shape. Fold the long 40 inch piece of yarn in half and place under the “ball” of yarn, making sure to center it as shown below.
Pull the open end of the long yarn through the folded end as show and pull to tighten it around the ball, making sure to keep it centered so the pompom will come out even (below) Pull very tightly, however, be careful not to pull so tight that you break the yarn (I have had this happen to me :0) Pull tight so that once the pompom is complete, you lose very few strands from your pompom or none.
Take one tail in right hand and one in left and pull apart tightly and wrap around ball to the back. Pull tightly taking care not to break the yarn and tie in a couple
knots. Repeat around the back again for added security.
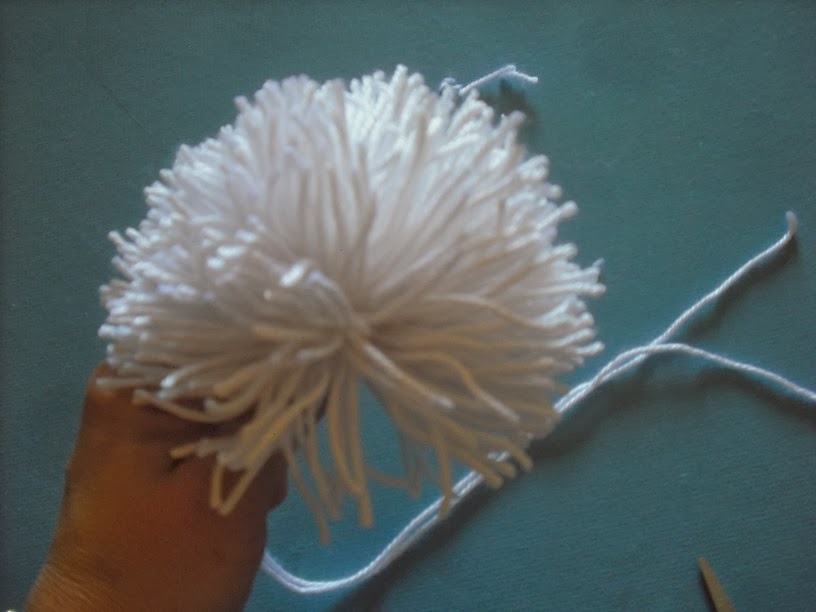
Once, tied and tight, hold the long string in your hand, and you will cut the loops in small sections until they are all cut (below)
Your pompom will be quite shaggy, so you will now groom it. Hold it as shown below, and trim around little by little in a rounded fashion, and shaking out often to see how it is looking, continue to trim as shown until you get a nice round fluffy pompom as shown below.
Let’s now attach it to your hat. Using the long string you tied it together with, attach it to the end of your hat. I normally attach it as close to the end as possible while making sure it is secure. I pull one end through one side of the hat and the other string through the other, and go back through again in the next hole and tie off very tight, that way it sort of pulls right back into the hat when you cut off the excess tail from the 40 inches you started with. (see next photo)

Congratulations! Your long tail pompom elf hat is now complete and ready to wear!
No comments:
Post a Comment