Sunday, February 23, 2014

Free Crochet Pattern Extra Thick Women's Kitty Cat Hat

Free Crochet Pattern Extra Thick Women's Kitty Cat hat

 Please do not copy, sell or offer these patterns as your own. Please share a link to my blog here for other's to find my free patterns, in doing so, I am able to offer more free patterns to everyone.

I recommend using Caron's Simply Soft yarn (sold at Joann Fabric & Craft stores or Micheal's Crafts) or yarn Bee Soft Secret yarn (sold at Hobby Lobby) because of the soft feel and beautiful sheen they have.They have a nice drape to them when your hat is complete and feel soft instead of scratchy like most standard inexpensive yarns. If you use another cheaper yarn unlike the ones I mentioned above, the hat may not come out the correct size or look & wear as nice. I also recommend gentle hand washing and air dry (no electric dryer).

This Extra Thick Kitty Cat hat crochet pattern is made working with 2 strands of yarn together to create an extra warm fun hat!

Crochet Extra Thick Women's Kitty Cat hat pattern

You will need:
Size  K hook
Size J hook
Size F hook
Yarn needle
Scissors

Abbreviations:
HDC....half double crochet
SC.....single crochet
SS.....slip stitch
CT.....count (stitch count)

Using 2 strands of yarn to work the hat, begin with magic circle (aka: magic loop) and CH2 (counts as first HDC), HDC9 into center of magic circle for a total of 10 HDC. Need help with the magic circle/magic loop? Check out my video tutorial here: 
SS into top of first CH of first HDC to close circle. I recommend tightening and securing magic lop with the method in video at this point to avoid it loosening and opening while completing your hat. 

Row 1: CH2 and HDC in same, HDC2 in each CH all around to end including very, very last CH (this is the only row that you will work into that super very last stitch that is sometimes hard to work into), SS into top of 1st CH of this row to close (from this point forward, I will just state SS) (CT: 20)
Row 2: CH2 and HDC in same, * HDC1 in next CH, HDC2 in next CH * repeat around to end, SS (CT: 29)
Row 3: Repeat Row 2 (CT: 42)
Row 4: CH2 and HDC in same, HDC1 in each CH around to end, SS (CT: 42)
Row 5: CH2 and HDC in same, HDC 1 in each of next 2 CH, HDC2 in next CH, * HDC1 in each of next 3 CH, HDC2 in next CH * repeat from * to * around to end, SS (CT: 52)
Row 6-20: CH2 and HDC in same, HDC1 in each CH around to end, SS (CT: 52)
Securely fasten off and weave in tail.

Kitty Ears:

Using J hook CH 12 
Row 1: turn, skip 1 CH, SC into 2nd CH all the way to end of row (CT: 11)
Row 2-12: repeat Row 1, leave about 18 inch tail (will be used as described below to SC around edge of ear and secure to hat.)

Your ear will look like this at first...
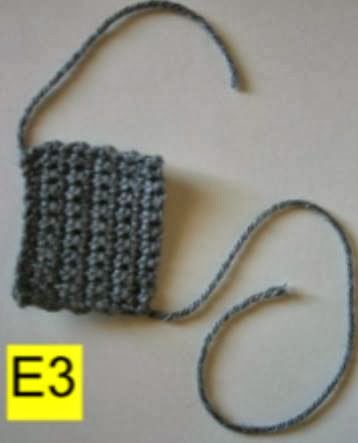
Fold square (ear) in half as shown with tails like this...
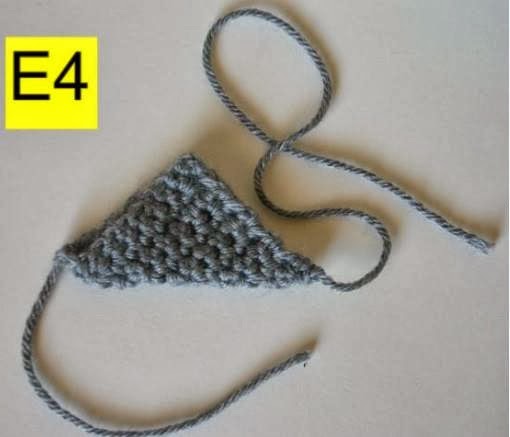
Use F hook and the long tail to SC around the 2 open sides closing them together to form a triangle shape (your ear) 
As an alternate, you can use a fuzzy yarn to SC around edge as shown in E5 photo below for fun.


Once your ear is sewn closed with a SC around edge, use the length of the yarn and a yarn needle to sew/secure it to your hat once you position them where you want them. I find it easier if you have a mannequin head or something to place your hat on while positioning the ears to attach them. This helps to position them better so you'll know how it will look when you wear it. 

Congratulations! You have now completed your Women's Crochet Kitty Cat hat!

Saturday, February 22, 2014

Free Crochet Super Slouch hat pattern

Free Crochet Super Slouch hat pattern


This pattern is pretty easy and quick and is great for a beginner with basic crochet knowledge!

 Please do not copy, sell or offer these patterns as your own. Please share a link to my blog here for other's to find my free patterns, in doing so, I am able to offer more free patterns to everyone.


I recommend using Caron's Simply Soft yarn (sold at Joann Fabric & Craft stores or Micheal's Crafts) or Yarn Bee Soft Secret yarn (sold at Hobby Lobby) because of the soft feel and beautiful sheen they have. They have a nice drape to them when your hat is complete and feel soft instead of scratchy like most standard inexpensive yarns. If you use another cheaper yarn unlike the ones I mentioned above, the hat may not come out the correct size or look & wear as nice. I also recommend gentle hand washing and air dry (no electric dryer).


Crochet Super Slouch hat pattern

You will need: 
Size P crochet hook
Size N crochet hook
Yarn needle
Scissors

Abbreviations:
CH.....chain
DC.....double crochet
SC.....single crochet
SS.....slip stitch
CT.....Count (stitch count)

Using a size P crochet hook, begin with magic circle (aka: magic loop) and CH3 (counts as first DC), DC 9 into center of magic circle for a total of 10 DC.  Need help with the magic circle/magic loop? Check out my video tutorial here: http://youtu.be/WTh2Eoww5Y0
SS into top of first CH of first DC to close circle. I recommend tightening and securing magic loop with method in video at this point to avoid it loosening and opening while completing your hat.

Row 1: CH3 and DC in same, DC2 in each CH all around to end including very, very last CH, (this is the only row that you will work into that super very last stitch that is sometimes hard to work into), SS into top of 1st CH of this row to close (from this point forward, I will just state SS) (CT: 20)

Row  2: CH3 and DC in same, * DC1 in next CH, DC2 in next CH * repeat from * to * around to end, SS (CT: 32)
Row 3: CH3 and DC in same, DC2 in each CH around to end, SS (CT: 62)
Row 4: CH3 and DC in same, DC1 in each CH around to end, SS (CT: 62)
Row 5 & 6: repeat Row 4 (CT: 62)

Begin 1st decrease:
Row 7: CH3 and DC in same, DC1 in each of next 3 CH, skip 1 CH, * DC in each of next 5 CH, skip 1 CH *, repeat fro * to * around to end, SS (CT: 53)
Row 8: CH3 and DC in same, DC next CH, skip 1 CH, * DC1 in each of next 3 CH, skip 1 CH *, repeat fro * to * around to end, SS (CT: 41)
Row 9-11: CH3 and DC in same, DC1 in each CH around to end, SS (CT: 41)
Row 12: CH3 and DC in same, DC1 in each of next 5 CH, skip 1 CH, * DC1 in each of next 7 CH, skip 1 *, repeat from * to * around to end, SS (CT: 36)

Switch to N hook:
Row 13-16: CH2, SC in same, SC1 in each CH around to end, SS  (CT: 36)
Make sure not to SC super tight, keep a little loose. When switching from DC to SC sometimes the SC stitches become overly tight, resulting in rim of hat being too tight. 

Securely fasten off and weave in tail.

Congratulations! You have now completed your Super Slouch hat!

Thursday, January 30, 2014

How to knit or crochet Red Heart Sashay ruffle scarf

How to knit or crochet Red Heart Sashay ruffle scarf


In response to many requests for more detailed information for the finished lengths of these ruffle scarves that I have tutorials for on Youtube.com…here is a closer look at these feminine ruffle scarves. If you have watched my tutorials on how to make these 3 scarves, than you will be familiar with each of the 3 different styles to make. Here are my video tutorials here: http://www.youtube.com/user/YvetteMarieCrafts
In the first photo,  is 3 different versions of the ruffle scarves that I made. The black and white scarf farthest to the left is the “real” crochet version in which I used 5 stitches and measures 53 inches long. The second version in the middle (red) is the “no-crochet-crochet” version and I used 10 stitches, and it measures 100 inches long. The last version on the right, in the earth tones, is the knit version, with 6 stitches, and it measures 65 inches long. Each scarf used a full skein of the yarn/mesh fabric.
As you can see, the one on the far left (crochet) and the far right (knit) versions are much fluffier. Even though I used 10 stitches on the red one, it is not nearly as fluffy as the other 2.
  
Let's take a closer look at them individually, #1 is the real crochet version, #2 is the no-crochet crochet version and #3 is the knit version.
 
I draped them in this manner, so you can see how the first and last ones ruffle all around even when they are draped in this manner, and the red one, which is the “no-crochet-crochet” version, does not. You can see the row of stitches at the top of the “drape” and the ruffles fall in one direction..which is one reason, it is not nearly as fluffy as the “real” crochet one, and the knit one.
I also sell a written PDF version that is delivered directly to your email, you can purchase it here in my online shop: http://www.etsy.com/shop/YvetteMariePatterns
I hope this information is helpful when you choose which version to make. Thanks for checking out Yvettemariesfineart and Have a super day!